Monday 25 January 2016

AS1: Task 13: Manipulating time and Space

Manipulating Time and Space


Our task:

   Our task is to demonstrate how editing can be used to manipulate time and space. We are going to film and edit a short sequence that includes either a memory or a flashback and use post-production (editing) techniques to make clear to the audience that the time and space in the sequence has changed.

 We are to work in a small group for this task. We also have to assign the following roles:
  • Director
  • Camera Operator
  • 2 X Actors


Screen Grabs from Adobe Premiere Pro to show the following:

  • Uploading the footage
  • Organising/labelling clips in bins
  • Using a range of editing tools. E.g. cropping, adding transitions, layering
  • Using audio. e.g. layering, manipulating audio levels
  • Converting the file format/exporting the film

Converting the file format/Exporting the film:


 To export the video to youtube, I would have to change this video's format  into youtube's format that way it will allow me to upload it in Youtube.

To do this you will have to go to file then down below you should be able to see 'Export' and by clicking into it you will see another column with a range of different options: Media, Title, Tape, EDL, OMF, AAF and Final Cut Pro XML. You are to choose the Media option and that will then bring you up to the next task.
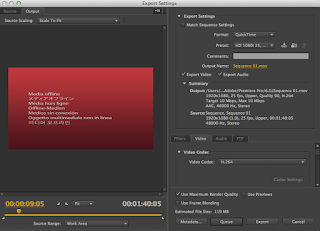


This is what comes up after clicking the 'media' option. This setting will let you choose different ways you can use to upload it to different sites.

NOTE!:
Before you do anything else in this setting you have to make sure that the timeline's duration beginning starts to 00:00:00:00. In the figure (at the left) it says 00:00:09:05 i will have to change this to all 0's to make sure every scene will be uploaded.
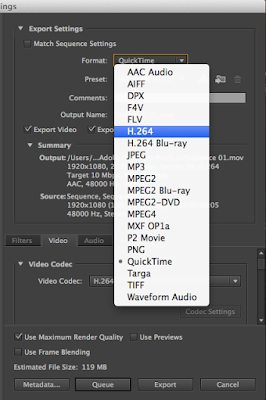


After making sure that the timeline starts with 00:00:00:00 you can now change the format in the style Youtube allows. In this case i have chosen the format 'H.264'. This will then allows me to upload my video in Youtube.


After choosing the format you wanted you can now then
chose the preset in where you would like upload the video you had made from Adobe Premiere Pr. In my case, i chose 'Youtube HD 1080p 23.976' because i would like to upload this video to my Youtube account so that i will then be able to transfer it in my blog.
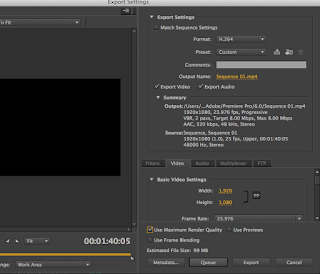


After choosing the format and preset you wanted you can now then start to queue your video. Just to make sure everything was right, go and have another check-through everything just in case you might have missed a step. You can no click on 'Queque' down below.


Using audio: Fade

In my video for Manipulating Time and Space i have added an audio to create a time when going back to past.
This is screen grab i took from the time when i had already uploaded my video in Youtube.
This is the start of fade transition. I had screen grab the duration in where it still has the first scene and at the same the fade transition is occurring.


This is the transition fade that is in between my two video scenes.
I use fade transition to present that the time is going back to past.


This is then the transition fade that comes after the black-out. This is the time where it jumps from scene one to scene two. You can still see the fade along with it that presents that time had moved backwards and we are now in the past.


This is now same scene from above but this doesn't have the fade transition along with it anymore as it has already jump from present time to past time.


Using audio: Dissolve


In my video i had included the use of dissolve in between two different scenes.
I have used a dissolve because it looks effective to have a dissolve included than a video clip going straight without any use of audio.
I used dissolve to make the video scene before dissolve appears and the video scene after dissolve appear look like it had jump in another time.


This is what a dissolve look like. You can see two image in silhouette style. This is the effect dissolve audio shows.                                    
Using a range of editing tools: Cropping

I use crop editing tools in my video because crop tool is very useful especially when editing videos.
Those yellow numbers that you can see from the image shown at the left side are the numbers that will then change your video. If the number in the row of left is changed from 0.0% to 2.0% that means your video clip will be cropped at the left.
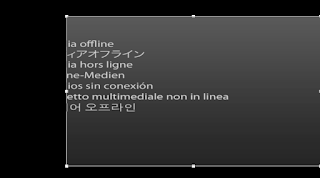


This is what a crop editing tool look like when it has been cropped in the top, bottom, left and right.


Story Behind the video:

 A group of friends used to be really close with each other that they always hang around after school. However, one day of them got into a relationship and ever since then they don't hang around that much anymore as they used to before. 
One day when they were in a classroom together they didn't talk with each other and thats when the past time comes in, in this video. the past time shows what before the time they are right now happened. In the past time, it shows when one of them (me) asked if they would like to go to cinema together as they used to do this quite often at the past. However, one of them (Allegria) didn't want to come because she'll be with her boyfriend then one (Jasmine) couldn't take this anymore therefore the argued. 
After the past time scene it jumps back in the present time where they talk about this.


animated-thank-you-image-0078

Sunday 13 December 2015

AS1: Task 12: Transitions and Effects

Transition and Effects


Style of Editing:

 The movement from one shot to the next is called a transition. Different transitions suggest different ideas to the audience. It is therefore really important to choose the right one.

Straight Cut:

 A straight cut is the most common and "invisible" form of transition. One shot moves instantaneously to the next without attracting the audience's attention. 

Straight cuts help to retain reality. They are used in continuity editing as they do not break the viewers suspension of disbelief.

Dissolves:

A dissolve fades one shot off the screen while another shot is fading in. The audience will be able to see both shots at the mid-point of the shots dissolves suggest that the shots are connected in some way. It might be two characters, places or objects. It might also suggest that some time has passed between the two shots.

Fades:

 A fade is a bit like a dissolve but instead of dissolving one shot into another. A fade is a gradual darkening or lightening of an image until the screen becomes black or white.

 A fade indicates the start or end of a particular section of time within the narrative.


 The fades used in this music video is seen when the video turn blank for a few seconds and it went back to them again. From duration 0.09 seconds.

Wipes:

 A wipe is quite an unusual transition. It is when one image is pushed off the screen by another.    Images can be pushed in any direction but it is more common for the image to be pushed off the left-hand side. This movement is more consistent with the sense of time moving forward.

 A wipe signals the audience that they are being shown different locations that are experiencing the same time. A visual equivalent of saying "meanwhile..."

Here is an example of a transitional wipes:


 Graphic Match:

  A graphic match is a very specialised type of transition. It is not something an editor ads between two shots but more a decision about which two shots to put next to each other.

 A graphic match is created when two shots similar in shape are placed next to each other. The graphic match tells the audience that there is very important link between whatever it is they are seeing in two shots.

Here is what a graphic match looks like in a film:


This is the graphic match that we see from Psycho. We can see that it matches the circular image of the plughole with the next image of Marion's eye.


Another example where graphic match is used is in the film called 'War of the World'.


The film 'War of the World' used graphic match twice. The graphic match in this film will be seen in the beginning. From the rain droplet on the leaf to the earth and from the sun to the red traffic light.

Another film who used graphic match is the famous film called 'Space Odyssey'. This film used graphic to show the past to future.


Manipulation of Diegetic Time and Space:

Diegetic= In the World of the text
Non-Diegetic= Outside the world i.e films, computer games

Non-diegetic:
- The characters can't hear their own music but the audience can.
- Some transitions can be included as a non-diegetic
- Subtitles and credits in the beginning

Diegetic:
- If characters playing music
- Off Screen 


 Editing "effects" are really important part of film making. They allow a filmmaker to very effectively manipulate of diegetic time and space. For example:
Wizard of Oz

  •  To show that a time period has changed in a flashback/forward
  •  To show a location is different
  •  To show that time is moving quicker or slower than normal

 The wizard of Oz is an example of manipulating time and space because this movie effect goes from black and white colour effect to technicolor. (Technicolor was first used in 1960's).


 An effect can be something really simple such as using a colour or remove it. Or it could be altering the saturation of an image to either enhance the colour or remove it. Making an image black and white is often used for flashbacks. For example: Momento


 The movie 'Magic Mike' used time and space by changing the filter colour of one scene. (as seen from one figure above). They used yellow filter to show different times.

  There are many different effects that can be added in the post production stage (editing). One of the most common technique is alter the speed of the footage.

  A films which uses this technique is The Time Machine. The time traveler enters the time machine and the environment changes as he travels through time


  A more modern  version of this effect is seen in the third of the Harry Potter films. The sequence using layering and altering the speed of the image.

                                                         Harry Potter Time Turner scene


Saturday 12 December 2015

AS1: Task 11: Creating Pace with Cross Cutting


Creating Pace with Cross Cutting


 Editing is vital in creating a sense of pace within a sequence.

 Our Task:

Our task is to film and edit a short sequence in which two characters are approaching each other from different locations.

 We are to film in a small group and we are to assign the following roles:
  • Director: Diana and Jasmine
  • Camera Operator: Diana
  • 2 X Actors: Bradley, Shivam, Samuel

 We are to use the pace of the editing to make it clear to the audience that they are about to meet. The pace of editing should be slower and the start when they are far apart and the pace should increase as they get closer.


  Using our editing skills we have included the use of pace within our video. We started our video in a normal speed and this speed continues until the characters are still at the classroom. From what I did, I had the video we had filmed to go from normal speed then increase speed quite a bit to show something's coming/ something's wrong then go back to normal pace again.

 In the scene when the two characters meet up outside the classroom, I had the speed quicken to show something went wrong. And another scene where i had the pace quicken was when i showed the 'drug' on the floor and then the teacher comes out right after the second it had appeared.

Plot:

The idea for this sequence is that there's two friends who are into 'drugs' and they go to school with it. Bradley and Samuel came in late to their lesson and they were to explain themselves to their teacher, Shivam. In class, they were talking about what they were going to do later on and one of them, Samuel, decided to head out first but to be able to get out of the class he will need the permission from his teacher. On his way out, he went and gave Bradley a signal to show that he needs to follow him. Few minutes after, Bradley asked his teacher, Shivam, if he can go to the toilet but his actually going to follow Samuel. 
When they were out of class, they drop the 'drug' without noticing and when the teacher came out of the classroom, he picked up the 'drug' and heard his students, Bradley and Samuel, talking about it and they were in trouble.


Tuesday 1 December 2015

AS1: Task 10: Understanding Pace

Understanding Pace


Speed Editing:

In a film each scene may last a matter of seconds, or it could continue for minutes but the length of each sequence establishes the pace of the film moving the action along.  The speed of editing will help to determine the mood of what is taking place on the screen.

Speed of Editing- Creating Pace:

  If the audience is to feel anxiety and suspense the editing will be quick - the scenes/shots changing frequently. 

This is an example in an action sequence:

                                                         The Bourne Ultimatum

  The Bourne Ultimatum is an example of a fast pace because it shows lots of different scenes that  last either a matter or seconds or continue for a minutes. You can see that this scene goes really quick from scene to another.

Speed of Editing- Creating Pace:

 If a relaxed mood is desired, the scenes last longer and change less frequently.

Here is an example in a romantic comedy.


 In contrast, The Notebook is different to The Bourne Ultimatum since The Notebook is much slower and last longer since the director of that film would like to have their audience to feel relaxed. And by doing that, they are to make the scene slower and last more than a minute.

Speed of Editing:

 Nevertheless a film need not have any editing. The film Russian Ark was filmed in one take using a steadicam and a digital camera. This required split-second timing and organisation.

Steadicam- A lightweight mounting for a film camera which keeps it steady for filming when handheld or moving.


 The Russian Ark didn't have any editing in use since they film it using the steadicam and a digital camera. This is a continuos movie. Every character(s) are to stay in the exact same place while being film otherwise they will have to start from the very beginning.

Speed of Editing:

 A trailer for a film needs to pack in detail from throughout the film. Therefore the editing will be very fast. 


 The Catching Fire is an example of a film that has a very fast  pace because the trailer of Catching Fire contains lots of editing which is why there are lots of different scenes in a few minutes. They have compressed the film to turn it into a trailer.

Speed of Editing:

 Try and view the extract from Pyscho where Marion (Janet Leigh) has checked into the Bates Motel and is about to take a shower..


 The Pyscho film had lots of editing before and during the attacks. Around 11-12 edits are done before the attack happen and about 17-20+ edits are done during the attacks. However, during the attack it didn't show the face of the killer and we didn't see where the woman was being stabbed.


Speed of Editing:

 Scenes at the beginning of a film- as it begins to tell its story- must be long enough for us to be able to understand where we are and what is going on. It also slow to introduce the main character(s). As the film progresses scenes may become shorter as the editing cuts between telling two or more story lines at the same time.

Cross Cutting:

 To cross-cut is to edit together two sequences that the audience need to know are connected in some way. Something is happening at the same time in different locations. A character reliving a memory

Developing Drama:

 Cross cutting can be used to very effectively develop a sense of drama. In the film called 'Scream' the death of Casey in the opening of scene was made more dramatic by the cross cutting to her parents approaching and almost making it home in time to save her.

  The cross cut in this scene is when Casey's parents are inside the house and it jumps to the scene where Casey was continually being stabbed while her parents were looking for her. 

Cross Cutting: 

 In the Film called "The Good, The Bad, and The Ugly"  we can see how the cross-cut comes in. The film had started really slow until the scene when 3 characters are in their position. It still continue with a slow pace until the scene whey they were showing the gun slowly.  As time goes by, the pace speeds up until we can only see their eyes creating eye-on match

                                                  The Good, The bad and The Ugly


Monday 30 November 2015

AS1: Task 9: Non-continuity

Non-Continuity Editing


 Non-Continuity Editing:
- Continuity is broken and construction is more apparent. Meaning often created through juxtaposition and metaphor shot inserts.
- Non-Continuity Editing is a style of film making that was made popular throughout the 1950s and 1960s. Filmmakers such as Jean Luc Godard ad Francois created a new style called "French New Wave". 
The French New Wave films used a carefree editing style and did not conform to the traditional editing etiquette of Hollywood films.

The French New Wave editing often drew attention to itself by its lack of continuity, its self-reflexive nature (reminding the audience that they were watching a film). They often used material not often related to any narrative which kept the audience surprised and intrigued.

Jump Cut:
- A jump cut is mainly used in films or television. It is an abrupt transition form one scene to another.

This is what a jump cut looks like in a cartoon version:

 This cartoon shows a man walking through the rain and  each slide shows different place of where the man is standing. From the beginning, middle and end we have seen the use of jump cut from this cartoon version of jump cut.


A Bout de Souffle (Breathless)- Jean-Luc Godard - Jump cut:

 
Jump cut from this scene (in the left) to the scene with the mirror (in the right)


  • The gap in action (when Seberg picked up the mirror) is emphasised by the use of a jump cut.
 Jump Cut is used to:
  • Startle the viewer
  • Draw attention to something 
  • Speeds up the action
  • Create Urgency
Here is the video clip of A Bout de Souffle (Breathless) showing the use of jump cuts.

                                                      A Bout de Souffle (Breathless)
  There had been around 11 jump cuts used in this film and that it shows that it's effective to use to jump cuts especially when your showing someone travelling. It is better to use jump cuts rather than a continuity editing because it will make your film longer if you use continuity editing.

Another example of a film where they have used the jump cut in the film called "E.T". The jump cut in this film is when they illustrate the shock on Elliot's face.

Here is the video clip of the film called "E.T" showing the use of jump cuts.

                                                             Extra Terrestrial (E.T)

The jump cut in this scene is when they were being chased and they've shown Elliot's face. Instead of just zooming in to Elliot's face, they use jump cuts to make it more effective.

Breaking the 180 Degree Rule:

Breaking the 180 degree rule is part of a non-continuity editing. They have ignored the 180 Degree Rule and there are still lots of modern film makers who use this technique. They use this technique when they want to create a startling  effect to the audience. Since the audience are mature enough they would figure that something is happening at that scene of the film because something went wrong. And by making the audience/viewer feel that, they are to break the 180 Degree Rule.

If you cross or break the 180 Degree Rule then the characters will appear to swap positions on the screen- this often used to convey something is going wrong.

 Here is an exmaple of a film where they have break the 180 Degree Rule:


 You can see from this scene that the man in suit was first positioned at the left and will then appear on the right after a few seconds because they have break the 180 Degree Rule.  This is effective especially for horror films because this could be the signal that somethings going to happen.

 Breaking the 180 Degree Rule is not only used in horror films but also in action films such the Hunger Games.


The bed was at the right now its in the left side of the film.


Thursday 26 November 2015

AS1: Task 8: Continuity Editing Techniques

Continuity Editing:                                                                   

'Continuity Editing' is what became knows as the popular 'classical Hollywood'  style of editing.
This was  developed by early European and American directors, in particular D.W. Griffith in his films such as The Birth of a Nation.

The classical style ensures temporal (time) and spatial (space) continuity as a way of advancing narrative, using such technique as the 180 degree rule, Match on Action, and Shot, Reverse Shot.

Our Task:

Our task is to film a short sequence that demonstrates our understanding of the key conventions of continuity editing.

We are to work in a small group for this task. We are to assign the following roles:

Directors
Camera Operators
2 X Actors

Our sequence must take place in school and should have at least two characters. We are to demonstrate the following conventions:

Match on Action
Eye-line Match
Shot, Reverse Shot
180 degree rule
Point of View


Match In Action:


 In the film that we have produced we have included Match in action in our film. We had myself to open the door from the outside of the room and the next scene shows me going through the door to the inside of the room. This shows a continuity within the film.

 If I had started opening the door from the outside of the room and the next scene shows me just opening the door from the outside of the room, that wouldn't be a match in action technique as it doesn't show any continuity from the last scene.

Eye-Line Match:


 We have used eye-line match technique in this film. We had Allegria to text her friend Diana ( that's me) and to show this, we had recorded her looking down her phone where as the next scene shows her messaging  me with the phone and the text showing. 

 If we had filmed Allegria looking down at her phone and the next scene is just from a different angle  of her phone showing, it wouldn't be an eye-line match example as it doesn't fully show what's Allegria's looking at.

Shot, Reverse Shot:


 We have included the use of shot, reverse shot technique in our film. We all know that shot, reverse shot is done by showing the person talking and the camera was positioned at the back of one of the two people while one of that person's back is being shown in the camera. And to reverse it, we are to do it the same with the other person.

 This is how we did our shot, reverse shot. We had filmed one of the person talking and the camera was positioned at the shoulder side of one of the person. And for the reverse shot, we did the exact technique we did with the other person.

 If we had filmed this scene in where the camera was positioned at the side of both characters, this wouldn't be called a shot, reverse shot as you are only moving the camera from left to right to show which person is speaking.

180 Degree Rule:

 We have also used the 180 degree rule in our film. We all know that the 180 degree rule is really important especially when producing a film because if you make a mistake and you've use the 180 degree rule wrong, it would look like as if scene had been reflection or re-positioned. Therefore, being careful when using the 180 degree rule is important.

 In our film we used the 180 degree rule by moving the camera just around the 180 degree line. If we had went over the 180 degree line even just by few degrees like 182/3 degree, your scene where you had person A at the left will now appear at the right side as you have went over the 180 degree rule.

Conclusion:

 We had carried each different technique well as with the match-on action, we were able to show the scene where I was opening the door and it shows the bit where the handle was shown clearly and the scene after that shows the time when I went through the door from the outside and it had shown a continuity within the film.

 In eye-line match, we had clearly showed what Allegria was looking at and that she was looking directly on to her phone since the scene after that shows the actual phone in where she is messaging me so we can meet up.

 With the shot, reverse shot, we managed to show each person speaking by taking a shot of them from the back of one of the character. We had the camera positioned at the right back side of that person so that the other person is being shown in shoulder with the person she is talking to.


Monday 16 November 2015

AS1: Task 7: Continuity Editing


Continuity Editing


Continuity Editing:

 Continuity editing is what had became known as the popular 'classical Hollywood' style of editing.
This is developed by early European and American directors, in particular D.W. Griffith in his films such as The Birth of a Nation.
The classical style ensures temporal (time) and spatial (space) continuity as a way of advancing narrative, using such techniques as the 180 degree rule, Match on Action, and Shot, Reverse Shot.

Continuity Editing us important because it helps retain a sense of realistic chronology and generates the feeling that time is moving forward.

This doesn't mean that you can;t use a flashbacks or flash forwards, as long as the narrative will still be seen to be processing forward in an expected or realistic way.

Key Continuity Techniques:

Eye-line match

this technique links two shots together. This is where we see a character looking at something off screen and then we cut a shot of what they are looking at.  This will then allow the audience to experience an event in the film just as the character is experiencing it.

This is what an eye-line match look like:


 This is an example of an eye-line match because it shows what the character is looking at and it shows a link between two images. The position of the camera is important especially when creating an eye-line match like the example shown above.

To create a perfect eye-line match, you are to make sure that the position of the camera is correct because it will then create a link between your two images. If your camera was positioned in the wrong way , for example of the guy above (Ben-Hur) if the guy was looking at the right and the camera was positioned at the left side of the woman, it won't create a link. Therefore, the position of the camera is important when creating an eye-line match.


Match on Action

This technique links two shots together. This is where we see a character start an action in one shot, the camera then cuts to a different angle and we see the character finish the action in the second shot. This technique ensures that the action seems like one natural and realistic movement even when the actor may have really performed it twice.

This is an example of a Match on action:

 This is an example of a Match on action because it shows a person going in/out of a room and it shows the point where the person holds out the door and the other image shows the time where she had came through the door. 


Shot, Reverse

Shot, Reverse is a technique links to two shots together. The first shot reveals one character and then the second shot reveals the second character. This allows the audience to connect the two characters and realise that they are interacting with each other. 


This is an example of a Shot, Reverse Shot:


 This is an example of a shot, reverse shot because it shows a scene about two person talking to each other with a close shot. The first images shown above, the man is in shoulder line with the lady he is talking too and to reverse it, the second images then shows the man who is also in shoulder line with the lady. 


The 180 Degree Rule

The 180 degree rule is a basic guideline that stares that two characters (or other elements) in the same scene should always have the same left/right relationship to each other. If the camera passes over the imaginary axis connecting the two subjects, it is called crossing the line.

This what a 180 degree rule look like:


In the 180 degree rule when filming the camera should always stay on one side of the infirmary line. If you cross the line characters will appear to swap positions on the screen.

Its is important to not break the 180 degree rule because if the the 180 degree rule wasn't obeyed then the person who first appeared at the right side will then appear in the left if the camera go over the 180 degree rule.

This is what it looks like when we go over 180 degree rule:


 The guy at the right hand side of the image above is not positioned at the left hand side of the images. 


 Using all of this technique is really important when making a film because all of this techniques eye-line match, match on action and 180 degree rule will make your film look continuos, seem real and perfect. Without any use of one of these techniques this make can make your film go wrong. If you didn't use an eye-line match, when person A was talking to person B, it will look like as if person A wasn't looking at person B even though they were talking to each other.

If a film maker forgot to use match-on action, for example person C is coming out of the door, it will look like as if person C went the wrong side because of no match on action use.